

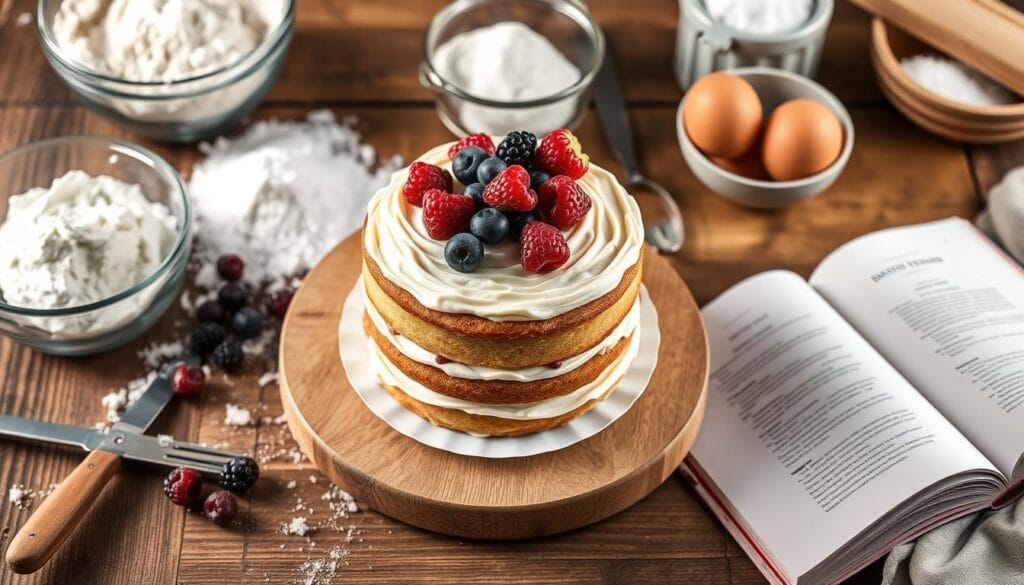
Imagine a delicious, moist cake that’s just the right size for a cozy celebration or an intimate gathering. A 6-inch cake is more than just a smaller version of a traditional dessert—it’s a practical and charming solution for serving 2-4 people. This size is perfect for birthdays, anniversaries, or even a special treat for a small group of friends.
Did you know you can transform a simple cupcake recipe into a stunning layer cake? By using cupcake batter, you can create soft, buttery, and flavorful layers that are easy to stack and decorate. This approach not only simplifies the baking process but also opens the door to endless creativity.
One of the best things about baking at a small scale is how versatile it is. Whether you’re in the mood for classic vanilla or rich chocolate, the flavor options are endless. Plus, decorating a small cake is a breeze, allowing you to add personal touches without the hassle of managing a large dessert.
In this guide, we’ll walk you through the step-by-step process of creating a perfect 6-inch cake. From the ingredients to the baking and frosting techniques, we’ll cover everything you need to know to make a show-stopping dessert that’s as delicious as it is beautiful.
Introduction to Small but Mighty 6 Inch Cakes
When it comes to celebrating life’s special moments, a 6-inch cake offers a charming and practical solution. Perfect for intimate gatherings, this size avoids the overwhelm of larger desserts while delivering big on flavor and presentation.
Why a 6 Inch Cake is Ideal for Small Gatherings
A 6-inch cake is tailor-made for smaller celebrations, ensuring every guest can enjoy a generous slice without waste. Using a 6-inch cake pan simplifies both baking and decorating, making it a breeze to handle.
The Versatility of 6 Inch Cakes in Celebrations
These cakes shine in various settings, from birthdays to bridal showers. Baked to perfection in 18-21 minutes, they offer a reliable result. Room temperature ingredients are key to achieving the perfect crumb, while precise sugar measurement ensures balanced sweetness. The shorter baking time guarantees a moist, fluffy texture, ideal for any celebration.
| Feature | 6-inch Cake | Larger Cakes |
|---|---|---|
| Ease of Handling | Very Easy | More Challenging |
| Baking Time | 18-21 Minutes | Longer |
| Decorating | Simple | Complex |
Whether it’s a cozy family dinner or an intimate party, a 6-inch cake brings elegance and delight, making every occasion special with its perfect blend of size and flavor.
Essential Ingredients and Tools for Your Cake
To create a flawless 6-inch cake, having the right tools and ingredients is crucial. Quality equipment ensures even baking and easy release, while precise measurements guarantee a perfect texture.
Choosing the Right Cake Pan and Parchment Paper Technique
A reliable cake pan is your best friend. Fat Daddio’s cake pans are an excellent choice due to their durability and even heat distribution. To prevent sticking, lightly grease both the pan and a parchment paper round. This ensures your cake releases smoothly without damaging the structure.

Importance of Room Temperature Ingredients and Measuring Accurately
Room temperature ingredients are vital for a uniform batter. Use unsalted butter, granulated sugar, and cake flour, measured precisely with a digital scale or measuring cups. Tools like a stand mixer and glass bowls help blend ingredients evenly, ensuring a moist and fluffy texture.
For frosting, using powdered sugar is key. Sift it before mixing to avoid lumps, ensuring a smooth and creamy result. Accurate measurements here are just as important as in the batter, so take your time to get it right.
Preparing the Batter: Transforming Cupcake Recipes into a Layer Cake
Creating a perfect 6-inch layer cake starts with mastering the batter. By adapting a cupcake recipe, you can achieve a moist and flavorful dessert. The key lies in precise mixing techniques and careful ingredient handling.
Mixing Techniques for Moist and Fluffy Batter
Begin by beating room-temperature butter and sugar until light and fluffy. This step is crucial for incorporating air, which ensures a tender crumb. Use an electric mixer on medium speed for about 3 minutes. Slowly pour in milk while mixing to maintain a smooth consistency.
Next, add flour and salt in small increments. This prevents overmixing, which can make the batter dense. Stop the mixer as soon as the ingredients are combined. Overmixing can lead to a tough texture, so it’s important to mix just until the batter comes together smoothly.
Converting Cupcake Batter for Layer Cake Success
To transform cupcake batter into a layer cake, adjust the ingredient quantities. Typically, a cupcake recipe yielding 12-15 cupcakes can be scaled up to make two 6-inch layers. Simply double the ingredients, ensuring accurate measurements for flour, sugar, and butter.
When scaling, maintain the same mixing technique. Beat the butter and sugar thoroughly, then gradually incorporate liquids. This method ensures even distribution of flavors and a light texture. For an extra moist batter, consider adding a tablespoon of sour cream or Greek yogurt.
If the batter becomes too thick, add a little more milk. If it’s lumpy, strain it through a fine-mesh sieve to remove any clumps. Properly prepared batter should flow smoothly off a spatula and hold its shape without being runny.

By following these steps, you’ll create a batter that bakes evenly and results in a delicious, layered dessert. Remember, room temperature ingredients and precise mixing are key to achieving the perfect texture and flavor.
Step-by-Step Guide: Crafting Your 6 inch cake
Creating a flawless dessert involves careful preparation and precise execution. Follow this detailed guide to ensure your baking process is smooth and enjoyable.
Prepping Your Pans and Oven: 6 Inch Cake
Start by preheating your oven to 350°F. Lightly grease your pans and line them with parchment rounds to prevent sticking. This step is crucial for easy cake release and maintaining structure.
Mixing, Baking, and Cooling Your Layers: 6 Inch Cake
Divide your batter evenly among the prepared pans for consistent layers. Bake for 18-21 minutes, using a toothpick to check doneness. Allow the layers to cool on a wire rack to ensure they set properly before assembly.
Timing Tips for Perfect Results: 6 Inch Cake
Monitor your baking time closely to avoid overcooking. The ideal time is between 18-21 minutes. Avoid opening the oven too early to prevent sinking. Once baked, let the layers cool completely for the best texture.
| Feature | Small Desserts | Larger Desserts |
|---|---|---|
| Ease of Handling | Very Easy | More Challenging |
| Baking Time | 18-21 Minutes | Longer |
| Decorating | Simple | Complex |

Decorating and Assembling the Perfect Layer Cake
Transforming your baked layers into a stunning dessert involves both creativity and precision. Whether you’re aiming for a classic look or something more elaborate, the right techniques will elevate your cake to new heights.
Frosting Options: From Vanilla Buttercream to Chocolate Ganache
Choose between vanilla buttercream for a light, sweet touch or rich chocolate ganache for a decadent feel. Each option offers a unique flavor profile that can complement your cake’s taste. For a silky texture, ensure your ingredients, like eggs and butter, are at room temperature.
| Frosting Style | Features | Best For |
|---|---|---|
| Vanilla Buttercream | Light, sweet, easy to color | Classic designs, spring themes |
| Chocolate Ganache | Rich, creamy, indulgent | Modern looks, chocolate lovers |
Layering and Smoothing Techniques for a Professional Finish: 6 Inch Cake
Start by trimming each layer with a serrated knife to ensure they’re even. Use an offset spatula to spread frosting smoothly. For a polished look, chill the layers before frosting and use a bench scraper to remove excess from the sides. This method ensures a crisp, clean finish. Don’t forget to add personal touches with fresh flowers or edible decorations on top for that final flourish.
Troubleshooting and Bake Time Tips: 6 Inch Cake
Ensuring your dessert is perfectly baked can sometimes be tricky. Let’s dive into common issues and how to solve them.
How to Ensure Your Dessert is Baked Through Without Overdoing It
A perfectly baked dessert should be moist but fully cooked. To check for doneness, insert a toothpick into the center. If it comes out clean, your dessert is ready. If not, bake for a few more minutes and check again.
A common issue is a sinking center. This can happen if the oven temperature is too low or if the dessert is taken out too soon. To fix this, ensure your oven is at the correct temperature and avoid opening the oven door until the minimum baking time has passed.
| Issue | Solution |
|---|---|
| Sinking Center | Check oven temperature; avoid early door opening |
| Sticking Sides | Properly grease pans; let cool slightly before removing |
| Dry Texture | Don’t overbake; use sour cream for moisture |
Adjusting bake time based on size and oven characteristics is crucial. Smaller desserts bake faster, while larger ones need more time. Using ingredients like sour cream can enhance moisture, while precise flour measurements ensure the right texture. Letting the dessert cool slightly before removing it from the pan helps the sides come off smoothly without breaking.
Conclusion
With the right tools and techniques, crafting a perfect dessert is within your reach. This guide has walked you through every step, from mixing the batter to decorating the final layers. Remember, accurate measurements and quality ingredients are key to achieving that moist, fluffy texture.
A small dessert offers big benefits—whether it’s for a cozy celebration or a special treat. Its versatility in flavors and ease of decorating make it a standout choice for any occasion. Don’t hesitate to experiment with frosting styles or add personal touches to make your dessert truly unique.
We’d love to hear about your baking journey! Share your experiences and photos in the comments below. Even if you’re new to baking, this recipe is designed to help you succeed. With these tips and a little practice, you’ll be creating stunning desserts like a pro.
So, go ahead and give this recipe a try. Whether it’s for a special moment this month or just because, your efforts will result in a deliciously practical and memorable treat. Happy baking!
FAQ
Why is it important to use room temperature ingredients for my cake?
Can I use a regular cake pan instead of a 6-inch cake pan?
How do I know if my cake is fully baked?
Can I make a layer cake using a cupcake recipe?
What if I don’t have sour cream for the recipe?
How do I prevent my cake from sticking to the pan?
Can I frost and serve the cake immediately after baking?
Why is using a stand mixer better for cake batter?
How do I store leftover cake?
There are no reviews yet. Be the first one to write one.


2 thoughts on “How to Make a Perfect 6 Inch Cake: Small but Mighty Recipe Guide”
Comments are closed.