

Imagine a dessert that combines the charm of a traditional bento box with the delight of a sweet treat. Bento cakes are the latest trend in baking, offering a cute, individualized way to enjoy cake. These mini cakes are perfect for gifting or celebrating on your own, making every occasion feel special.
What makes bento cakes so appealing? Their small size, typically around 4 inches in diameter, makes them a personal and thoughtful option. Plus, they’re incredibly versatile—whether you’re a fan of classic vanilla or want to experiment with unique flavors like matcha, there’s a bento cake for everyone.
In this guide, we’ll walk you through everything you need to know to make bento cake at home. From the essential equipment and ingredients to a step-by-step recipe and decorating tips, we’ve got you covered. By the end, you’ll be ready to create your own adorable mini cakes that are almost too cute to eat!
Ready to get started? Let’s dive into the world of bento cakes and uncover the secrets to making these delightful treats.
Introduction to Bento Cakes
Discover the charm of bento cakes, a delightful fusion of tradition and modern dessert trends. Originating from the concept of Japanese bento boxes, these small, individual treats have evolved into a popular confectionery delight.
What Makes Bento Cakes Unique?
These miniature cakes are typically 3-4 inches in diameter, making them perfect for single servings. They often feature 2-3 layers with simple yet elegant buttercream designs. Unlike standard cakes, bento cakes are designed for individual portions, offering a personalized and thoughtful experience.

The Appeal of Miniature Treats
The allure of bento cakes lies in their creative and personalized nature. With options to add custom messages, they become ideal gifts for various occasions. Their compact size and aesthetic appeal make them a favorite on social media, capturing the hearts of bakers and gift-givers alike.
Understanding the Bento Cake Trend
The rise of the bento cake trend is a fascinating story that blends cultural heritage with modern creativity. Originating from the concept of Japanese bento boxes, these small, individual treats have evolved into a beloved dessert option.
Origins and Cultural Influence
The term “bento” comes from Japan, where it refers to a convenient, boxed meal. Over time, this concept inspired a new dessert trend—miniature cakes designed for single servings. These small cakes typically feature 2-3 layers with simple yet elegant buttercream designs, making them both charming and delicious.
- Cultural Roots: The idea of bento cakes draws from the traditional Japanese bento boxes, which emphasize portion control and presentation.
- Modern Twist: The trend has been influenced by global baking practices, incorporating various flavors and designs.
- Online Popularity: Video tutorials and social media have played a significant role in spreading this trend, making it easier for home bakers to create their own versions.
These miniature treats have become a hit on social media, with their compact size and aesthetic appeal capturing the hearts of many. Whether you’re a fan of classic vanilla or unique flavors like matcha, there’s a bento cake for everyone. The ability to customize with messages or designs adds a personal touch, making them ideal for gifts or special occasions.
The emergence of this trend aligns with the growing demand for personalized and visually appealing desserts. As more people discover the joy of creating these small masterpieces, the bento cake trend continues to grow, offering a delightful blend of tradition and modern creativity.
Gather Your Equipment and Ingredients
Before you start baking, it’s essential to have the right tools and ingredients ready. This ensures a smooth and enjoyable process.
Essential Baking Tools
To make perfect mini cakes, you’ll need a few key tools. Start with 5-inch cake tins, as they provide the ideal size for these treats. A mixer or electric whisk is crucial for creaming sugar and butter. Don’t forget a spatula for scraping the sides of your mixing bowl and a digital scale for precise measurements.
Using parchment paper is a tip from many video tutorials. It helps prevent the cakes from sticking to the tins. Line your tins before adding batter for easy removal.
Key Ingredients and Measurements
Your ingredients should be at room temperature for the best texture. For the cake, you’ll need 120 grams of self-raising flour, 100 grams of caster sugar, and 60 grams of unsalted butter. Add two large eggs and 60 ml of milk to complete the mix.
Measurements are vital. Use a digital scale to ensure accuracy. This precision helps maintain the right texture and consistency in your cakes. Keep your instructions clear and follow each step carefully for the best results.

Before starting, check off each tool and ingredient. This organized approach sets you up for success and makes the baking process more enjoyable.
Step-by-Step Bento Cake Recipe
Creating a delicious bento cake involves two main components: baking the perfect sponge cake and crafting a creamy buttercream frosting. Follow this step-by-step guide to make your own at home.
Baking the Perfect Sponge Cake
Start by preheating your oven to 180°C (non-fan). In a mixing bowl, combine 120 grams of self-raising flour, 100 grams of caster sugar, and 60 grams of unsalted butter. Mix these ingredients for about 30 seconds until well combined.
Add two large eggs and 60 ml of milk. Mix until smooth, ensuring no lumps remain. Pour the batter into a 5-inch cake tin lined with parchment paper. Bake for 45 minutes, checking doneness by inserting a skewer—if it comes out clean, the cake is ready.
Preparing the Homemade Buttercream
To make the buttercream, sift 200 grams of icing sugar into a bowl. Add 60 grams of unsalted butter and a teaspoon of vanilla extract. Mix until creamy and smooth. This frosting is perfect for layering and decorating your cake.
Once the cake cools, use a serrated knife to level it. Place one layer on a serving plate, spread a layer of buttercream on top, and add the second layer. Frost the outside and decorate as desired.
| Step | Action | Details |
|---|---|---|
| 1 | Mix Dry Ingredients | Combine flour, sugar, and butter |
| 2 | Add Wet Ingredients | Mix in eggs and milk |
| 3 | Bake | 45 minutes at 180°C |
| 4 | Prepare Buttercream | Sift icing sugar, mix with butter |
| 5 | Assemble | Layer and frost the cake |
Tips for Achieving the Ideal Cake Layers
Achieving perfectly even and stable layers is crucial for a professional-looking dessert. Whether you’re a novice or an experienced baker, mastering this step ensures your treat stands out. Let’s explore expert techniques and essential tips to help you succeed.
Layering Techniques for Structure
To ensure structural integrity, start by leveling each layer using a cake leveler or serrated knife. This step prevents wobbling and ensures even distribution of frosting. When stacking, apply a thin, even layer of buttercream between each layer to act as glue. This technique not only stabilizes the structure but also enhances flavor and texture.
Baking Time and Temperature Essentials
Precise temperature and time control are vital. Always use a digital thermometer to ensure your oven is at the correct temperature, as even small variations can affect results. Bake on the middle shelf to avoid a crusty outer layer. Check for doneness by inserting a skewer—if it comes out clean, your layers are ready. Remember, slight adjustments in baking time can significantly impact the final texture and appearance of your layers.
Mastering Your American Buttercream and Piping Skills
Perfecting the art of American buttercream and piping is essential for creating visually stunning and professional-looking desserts. This section will guide you through achieving smooth, creamy frosting and mastering various piping techniques to elevate your cake decoration skills.
Creating Smooth, Creamy Frosting
Achieving the perfect consistency in your American buttercream is key. Start by ensuring all ingredients are at room temperature. Combine sifted icing sugar, unsalted butter, and a hint of vanilla extract. Mix until smooth and creamy, avoiding over-mixing which can incorporate too much air. If the frosting is too stiff, add a little milk. If it’s too runny, add more icing sugar. This balance is crucial for smooth frosting finishes.
Piping Techniques and Nozzle Tips
Once your buttercream is ready, it’s time to pipe. Use a piping bag fitted with a Wilton 1E tip for smooth, even layers. For decorative borders, try the Wilton 5 or 6 tips. Always fill your piping bag neatly, twisting the top to avoid air pockets. Practice piping strokes on parchment paper before decorating your cake to ensure steady hands and consistent results. Watching YouTube tutorials can provide valuable insights and tips for mastering these techniques.
Remember, practice makes perfect. Don’t be discouraged if your first attempts aren’t flawless. With time and patience, you’ll achieve professional-looking results. Happy piping!
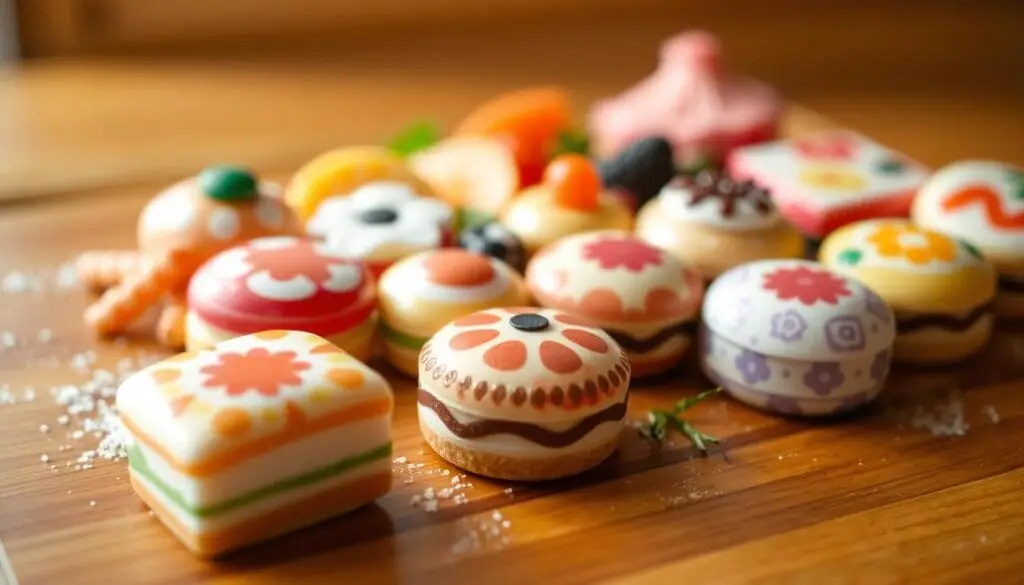
Creative Decorating Ideas for Your Bento Cake
Transform your mini treats into one-of-a-kind masterpieces with these creative decorating ideas. Personalized messages and unique embellishments can make your creations truly special, allowing you to express your creativity and add a personal touch to every mini cake.
Personalized Messages and Embellishments
Add a heartfelt message using Sweet Stamp tools or edible paint. These tools make it easy to create personalized notes that turn your dessert into a thoughtful gift. For instance, you can write a name, a special date, or a meaningful phrase to make the treat even more memorable.
Enhance the visual appeal of your creation by using edible gel colors and sprinkles. Halo Sprinkles are a great choice for adding a burst of color and texture. You can also use pre-made letter stamps for quick personalization, making it easy to add a custom touch without much effort.
Combine textures and colors to create visually appealing designs. For example, pair smooth buttercream with crunchy sprinkles or add a delicate piping border for contrast. Video tutorials can provide inspiration and guidance on various piping and lettering techniques to help you achieve professional-looking results.
Don’t be afraid to experiment with different decoration styles for special occasions. Whether it’s a birthday, anniversary, or holiday, your creativity can make each treat unique and meaningful. Remember, the process of decorating is just as enjoyable as the final result, so have fun and let your imagination shine!
Using Bento Cake Boxes for Presentation
Presentation plays a crucial role when gifting mini cakes. A well-chosen box can elevate your creation, making it a memorable gift. Whether it’s for a birthday or an anniversary, the right packaging adds a personal touch.
Choosing the Right Box and Transfer Methods
Selecting the perfect box is essential. You can opt for a cupcake box or a dedicated bento cake box. Both options are designed to fit your 4-inch diameter treat, ensuring it stays secure and looks appealing.
To transfer your cake without damaging its design, place a sheet of parchment paper at the bottom of the box. Gently slide the cake onto the paper, ensuring it’s centered. This method prevents any frosting or decorations from sticking to the box.
A well-designed box enhances the visual appeal of your cake. It not only protects the treat during transport but also showcases your creativity. For added security, place the box in a decorative bag, keeping your cake fresh and intact.
Remember, the box serves dual purposes—presentation and storage. Encourage creative packaging by matching the box’s design to your cake’s theme. This attention to detail makes your gift even more special and reflects the uniqueness of your creation.
Overcoming Common Baking Challenges
Baking can sometimes present unexpected obstacles, but with the right strategies, you can easily overcome them. Whether it’s a dense texture or a decoration mishap, these tips will guide you through troubleshooting common issues.
Troubleshooting Cake Texture Issues
Achieving the perfect texture is crucial for a delicious treat. If your cake turns out too dense, it might be due to overmixing the batter. Stop mixing as soon as the ingredients come together. Another common issue is a soggy center, which often results from underbaking. Use a skewer to check doneness—when it comes out clean, your cake is ready.
| Issue | Cause | Solution |
|---|---|---|
| Dense Texture | Overmixing batter | Stop mixing once ingredients combine |
| Soggy Center | Underbaking | Use a skewer to ensure doneness |
| Uneven Layers | Incorrect oven temperature | Invest in a digital thermometer |
Tips to Avoid Decoration Mishaps: Bento Cake
Decorations can make or break the presentation of your treat. To prevent slipping, chill your frosted cake in the fridge for 10 minutes before decorating. For crisp piping lines, ensure your buttercream is at room temperature. If a mistake occurs, gently scrape off the frosting and start over. Practice on parchment paper first to build confidence.
Remember, every challenge is an opportunity to improve. With these practical solutions, you’ll be well-equipped to handle any baking setback and create stunning, delicious treats every time.
Incorporating Video Tutorials and Online Resources: Bento Cake
Learning to make bento cakes can be even more enjoyable with the help of video tutorials. These visual guides provide step-by-step instructions that complement written recipes, making complex techniques easier to understand. If you’re a visual learner, watching an expert demonstrate layering or piping can be incredibly helpful.
Recommended YouTube Guides: Bento Cake
Channels like Cakes by Lynz offer excellent video tutorials that cover everything from basic baking to intricate decorating. These guides are perfect for beginners who want to see the process in action. Many experienced bakers also share their personal tips and tricks, offering insights you might not find in written instructions alone.
| Resource Type | Benefits | Recommended For |
|---|---|---|
| Video Tutorials | Visual demonstration of techniques | Understanding layering and piping |
| Online Guides | Step-by-step instructions | Clarifying complex methods |
| YouTube Channels | Expert tips and variations | Advanced decorating ideas |
Combining video tutorials with written instructions can significantly improve your results. Don’t hesitate to explore these resources and subscribe to trusted channels for ongoing inspiration. Remember, seeing the process in action can make all the difference in mastering your bento cake skills.
Innovative Variations and Recipe Modifications: Bento Cake
Customizing your mini treats to suit different occasions or personal preferences is easy with a few simple adjustments. Whether you want to scale up or down, modify flavors, or create unique designs, these tips will help you make the most of your recipe.
Scaling Up or Down for Different Occasions: Bento Cake
- Adjust ingredient quantities proportionally to match your desired serving size. For larger gatherings, double or triple the recipe while maintaining the same proportions.
- Use leftover batter to bake cupcakes, perfect for a quick dessert or snack. Simply pour the remaining mix into cupcake liners and bake for 15-20 minutes.
- For deeper cakes, add an extra layer by increasing the batter quantity and extending the baking time by a few minutes. Ensure to check for doneness with a skewer.
Minor tweaks can make a big difference. Adding a minute to the baking time can enhance texture, while reducing sugar content can create a lighter taste. Keep measurements precise to maintain consistency and texture.
Experiment with flavors and decorations to match celebrations. From adding a personal message to using vibrant colors, every adjustment allows you to craft a unique treat. Let your creativity shine and enjoy the process of making something truly special.
Conclusion
With these simple steps, you can create your own adorable mini cakes at home. Bento-style treats offer a charming way to enjoy dessert, combining tradition with modern creativity. Whether you’re celebrating a special occasion or just indulging, these small cakes are perfect for personalizing and sharing.
Your journey from gathering equipment to final decoration is now complete. Remember, the key to success lies in precise measurements and the right tools, like a 5-inch tin for the perfect size. Don’t hesitate to experiment with frosting flavors, piping tips, and personalized messages to make each treat unique.
For more inspiration, explore video tutorials and online guides that offer step-by-step instructions and creative ideas. Embrace the fun of making these mini masterpieces and share your creations with friends and family. Subscribe for more detailed recipes and tips to enhance your baking skills. Happy baking!